Monday, July 8, 2013

Low-carb Mediterranean and Margherita Pizza plus "Chips"


If you're going to follow the low carb lifestyle, there's 2 things you need to know: (1) You can't cheat (otherwise you have to start Phase 1 all over again and (2) You need to know how many carbs are in food. A good carb counter is necessary. Use this one. Once you start, you will get to know quickly what is “LOW” and what is “NO”.


I have 2 pizza crust recipes I will try in the future – one with a cream cheese based crust and the other is cauliflower based but I'm not going to post them until I can validate that they are great! Here are 2 that I make regularly:


Mediterranean Pizza – 9 carbs


2 tsp olive oil

2 tsp minced garlic

1 Mission Carb Balance flour tortilla – 6 carbs

½ cup shredded Italian cheese blend or mozzarella cheese – 1 carb

¼ cup crumbled feta cheese – 1 carb

½ cup fresh or frozen* chopped spinach – 1 carb

Oregano


Preheat oven to 400°.


Cut a piece of foil to just a bit larger than the tortilla – spray with olive oil or any non-stick spray. Place tortilla on foil.


Heat olive oil in a small non-stick skillet. Once it’s hot, add garlic and sauté for just a minute – do not allow to brown.  Pour onto tortilla and spread across tortilla with a basting/pastry brush. (If you use one of their larger burrito-sized tortilla, adjust the carbs and use more olive oil and garlic, cheeses and spinach.)


*If using frozen spinach, heat it in the skillet, stirring frequently until hot.


Cover the garlic oil covered tortilla with the Italian cheese blend, feta cheese, and spinach. Season with a bit of oregano, or Italian seasoning if preferred. Kalamata olives would be great to add and only 1 carb!


Bake on the highest oven rack for about 10-12 minutes or until cheese melts. If you don’t like the crispy crust, make sure you cover the tortilla with the cheese all the way to the edge.


Use a pizza cutter to cut in 4 slices, or just roll it up for a Mediterranean Wrap on-the-go.


Margherita Pizza


2 tsp olive oil

2 tsp minced garlic

1 Mission Carb Balance flour tortilla – 6 carbs

½ cup shredded mozzarella cheese – 1 carb

1 T fresh grated Parmesan cheese – < 1 carb

1 Roma tomato – 2 carbs

Kosher salt and pepper

3-4 fresh basil leaves, or dried basil


Preheat oven to 400°.


Cut a piece of foil to just a bit larger than the tortilla – spray with olive oil or any non-stick spray. Place tortilla on foil.


Heat olive oil in a small non-stick skillet. Once it’s hot, add garlic and sauté for just a minute – do not allow to brown.  Pour onto tortilla and spread across tortilla with a basting/pastry brush.


Combine the mozzarella and Parmesan and cover the garlic oil covered tortilla with the cheese.


Thinly slice the tomato, season with salt and pepper and place on top of the cheese. Cut basil into strips and add to the top of the pizza.


Bake on the highest oven rack for about 10-12 minutes or until cheese melts. If you don’t like the crispy crust, make sure you cover the tortilla with the cheese all the way to the edge.


Use a pizza cutter to cut in 4 slices, or just roll it up for a Mediterranean Wrap on-the-go.


Other pizza options – low carb


You can make a traditional pizza using the tortilla, but either make your own sauce or find a jarred sauce that is under 7 carbs a serving. Make the pizza upside down – cheese on the bottom and the sauce drizzled on the top,


Other low carb toppings – sausage, bacon, ground meat, green onions, peppers, mushrooms (not too many!)


If you want pepperoni, the best thing to do is to lay it out on paper towels and make sure to cover it with a paper towel and microwave it for about 30 seconds. Much of the grease will be absorbed into the towel rather than onto the pizza.

You can also make "chips" with pepperoni using the same method, but you cook it for a minute. There are great to use as a chip to eat cheese dips, spinach dip,  artichoke dip , or any other low carb dip.

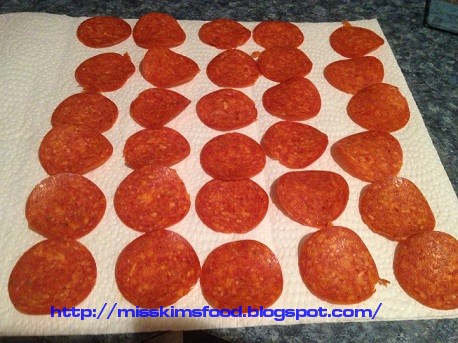
Arrange on paper towels without overlapping. I put 3 layers on the bottom and 2 layers on top.

Place in the microwave and cook for 30 seconds for pizza topping or 1 minute for chips.

You can see the amount of grease that is removed by microwaving. Now you know why your pizza has puddles of grease when you order from the pizza shop.

Place chips in a baggie and store in the fridge. These are also food by themselves when you need something crunchy to eat!
 

Sunday, July 7, 2013

Low-Carb Recipies - Shrimp Scampi

Kim's Shrimp Scampi - 9 carbs including the pasta


I've been on and off the low-carb roller coaster for years. One thing I know, I feel better when I'm not eating sugar - but it just tastes so darn good! So now I'm going back and using a blog to - hopefully - keep me on track. If you do see me eat something with sugar, please don't judge (it just may be a scheduled "cheat day") - HA!

I was going to try to incorporate Paleo into my low-carb lifestyle (LIFESTYLE - because it should be a lifestyle, not just a fad), but I see the conflict with dairy - I can live without white stuff, but not without cheese! And cheese is relatively low carb!

The Paleo Diet is based upon eating wholesome, contemporary foods from the food groups our hunter-gatherer ancestors would have thrived on during the Paleolithic era, the time period from about 2.6 million years ago to the beginning of the agricultural revolution, about 10,000 years ago. These foods include fresh meats (preferably grass-produced or free-ranging beef, pork, lamb, poultry, and game meat, if you can get it), fish, seafood, fresh fruits, vegetables, seeds, nuts, and healthful oils (olive, coconut, avocado, macadamia, walnut and flaxseed). Dairy products, cereal grains, legumes, refined sugars and processed foods were not part of our ancestral menu. - from Loren Cordain, Ph.D., the world's leading expert on Paleolithic diets and founder of the Paleo movement.

There are 2 products that I can speak highly of, and that I use quite regularly - Mission Carb Balance flour tortillas (6 carbs) and Dreamfields pasta (5 carbs) - click on the Dreamfields link and get a coupon for $1 off. Both of these are available at Walmart. I will use these quite frequently in my recipes.
Here's the first recipe I'm sharing, because I make it all of the time. Takes about 20 minutes to make, so it's my go-to meal. This recipe is for 1 person, so just increase as needed. Since the pasta becomes carb-impacting when it is reheated, I only make enough for one meal.

Kim's Shrimp Scampi

8 oz of uncooked cleaned and deveined shrimp -1 carb
1 T butter + 1 T butter
1 T olive oil
1 T minced garlic
2 T fresh lemon juice (about ½ of a lemon) - 2 carbs
2 tsp lemon zest
½ cup of any of the following - white wine or chicken stock or vegetable stock
1 serving of Dreamfields pasta (I use angel hair) - 5 carbs
Fresh grated Parmesan cheese - 1 carb
Fresh or dried parsley
Fresh ground pepper

Put the water for the pasta on to boil. While waiting for the water, heat a medium non-stick skillet over medium heat. Add olive oil and 1 T butter until butter is melted and sizzling. Add shrimp and cook on each side until pink - this takes just a minute, so don't walk away. When the shrimp is done, remove only the shrimp to the bowl you will be using to eat - why dirty another bowl?

Now add the garlic to the oil/butter in the skillet and cook for just a minute. Add the lemon juice, lemon zest, and wine/stock and bring to a boil. Simmer for about 2-3 minutes allowing it to reduce.


*Hopefully, your water is boiling by now and the pasta is in the water. I use angel hair because it only takes 5 minutes or less to cook and I like the small pasta.

As soon as the sauce has reduced, add the other tablespoon of butter and once it is melted add the shrimp back into the skillet. Do not overcook the shrimp. If the pasta is not done, take the sauce off of the heat and wait till the pasta is ready before adding skillet back on the heat and adding the shrimp.

Drain the pasta and add it to the shrimp, tossing to coat evenly with the sauce. Serve in the bowl and season with the Parmesan, parsley and pepper.

Saturday, July 6, 2013

4th of July Meat Maddness

For some reason, the 4th of July dinner table was mostly meat. I didn't take any pic's of the food, because they were all new recipes, but since they were all do-overs, I'll take pic's next time I make them. OK - we did have a big green salad (thanks Jen!) and some baked beans (thanks Jo!) and some grilled asparagus, but everything else was MEAT! Grilled Wings*, Orange Chicken* - also grilled, Pork Tenderloin* - also grilled, Hot Dogs, and BBQ baby back ribs. (Do you see a theme??? Well of course - it was the 4th and grilling is super easy!)

Unfortunately, none of there recipes will be used for lunch at CF Academy because we just can't grill for that many kids at lunch, but maybe a special meal?!?!

This was such a great low-carb meal until we got to dessert - brownies, cinnamon pinwheels* (just made that up, but it's what Mom always made with leftover pie crust when she made pies), and red, white, and blue french vanilla cake. The only pic I have is of the cake. I'll post the tutorial I used to make this cake, but next time I will add tons more of the "spots".

* - recipes below


Grilled Wings


Ingredients 


Makes about 10 servings 

Wings:

1/2 cup soy sauce  
1/2 cup Italian-style salad dressing  
3 pounds chicken wings 

Sauce: 

1/4 cup butter  
1 teaspoon soy sauce  
1/4 cup Frank's RedHot


Directions


Combine 1/2 cup soy sauce, Italian dressing, and chicken wings in a large, zip-top bag. Close bag and refrigerate 4 hours to overnight. I did them overnight and when I woke up in the morning, I turned the bags over to make sure they were marinating evenly. 


I used a paper towel and rubbed the grill with some olive oil to prevent sticking, then preheated the grill to medium heat. 


In a small saucepan, melt the butter. Stir in the 1 teaspoon soy sauce and the Frank’s sauce. Simmer on low for about 3-5 minutes. I made all of the sauces the night before so all I had to do was warm them up to serve.


Remove the chicken wings from the marinade. Cook the wings on the grill, turning occasionally, until the chicken is well browned and no longer pink, 25 to 30 minutes. Serve the wings with the sauce on the side. These wings were great on their own, but the hot sauce will satisfy those who like to eat fire!


Honey Orange BBQ Chicken


Ingredients


Marinade: 
 

½ cup freshly squeezed orange juice
¼ cup olive oil
¼ cup hot sauce
¼ cup Dijon mustard
1 tablespoon grated orange zest
3 pounds of boneless chicken breast or thighs, cut into evenly sized pieces (so they cook in the same amount of time)

Sauce:

4 tablespoons butter
¼ cup honey
¼ cup freshly squeezed orange Juice
½ cup of your favorite BBQ sauce – I use Sweet Baby Ray’s
1 tablespoon grated orange zest
2 tablespoons Dijon mustard
½ teaspoon cinnamon

½ teaspoon cloves
½ teaspoon nutmeg


Directions

Mix the orange juice, olive oil, hot sauce, mustard, and orange zest together in a large bowl. Add the chicken to a zip-top bag and add the marinade. Let it marinate for at least 1 hour and up to overnight.
I did them overnight and when I woke up in the morning, I turned the bags over to make sure they were marinating evenly. 

Preheat the grill to medium. Let chicken come to room temperature before grilling.

Drain the chicken from the marinade. Grill on each side for 5 minutes, then turn the heat to medium-low and cover the lid of the grill. Continue cooking the chicken until it's cooked through, about 10 minutes more.

To make the sauce, melt the butter in a small saucepan. Whisk in the honey, orange juice, BBQ sauce, zest, mustard and spices.

Remove the chicken from grill to a platter and serve with reserved glaze. I let the chicken rest for about 10 minutes and sliced the chicken into strips for easier serving.